BTemplates.com

About This Blog

Powered by Blogger.

Search This Blog

Thursday, August 22, 2013

How to configure search in SharePoint 2010?


Hi Guys,

Here I jot down the search configuration steps for you.

Step 1.1 Go to the Central Admin Site and then click on "Application Management" and then on "Manage Service Application".


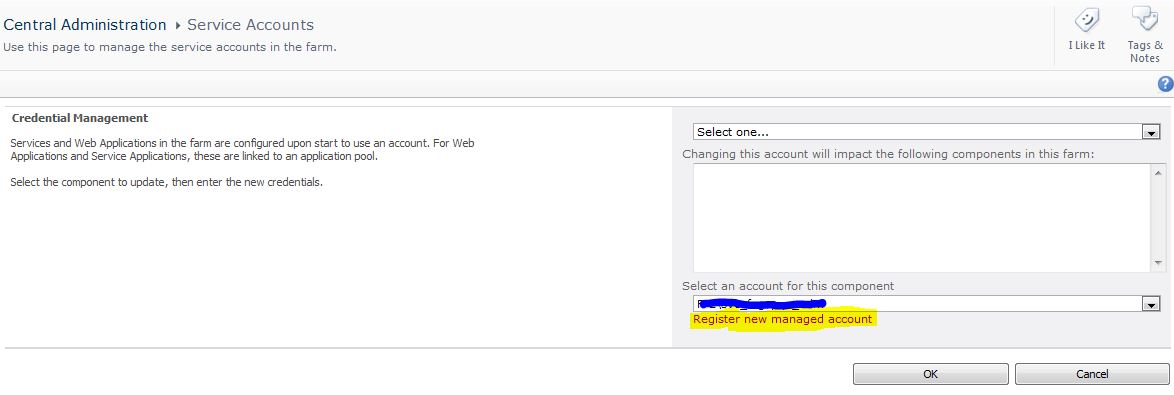
Step 1.2 Then click on "New" and then "Search Service Application".

Step 1.3 Then fill the following columns.
              Name                            : Search Service Application
              Search Service Account : Domain\User_Seacrh
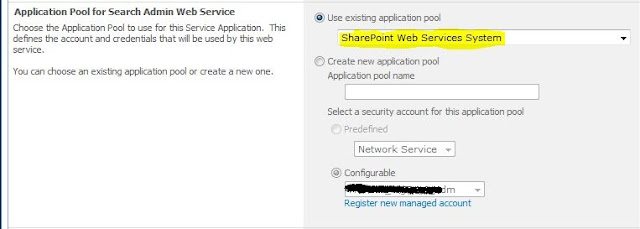
              Application Pool for Search Admin Web Service : "Use existing application pool" 
              Application Pool for Search query and site setting Web service : "Use Existing Application pool"


    Then Click on "OK".
The Search Service Application has been created.

No we need to do some more configuration..
Step 2.1 Now go to "Application Management",then "Manage Service Application" and then Select "Search Service Application".
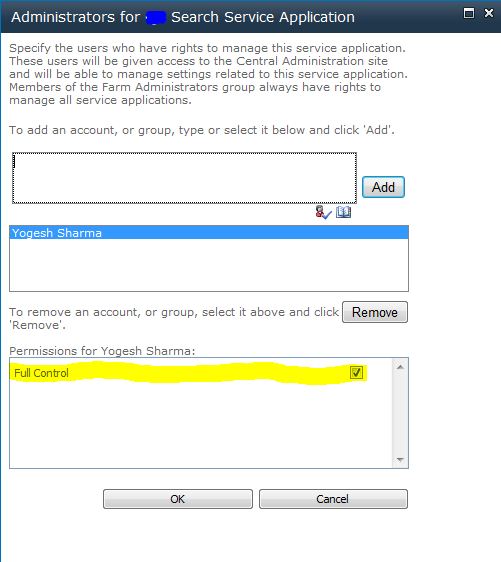
Click on "Administrators" ribbon button to configure the search service administrators.


Step 2.2 Add the "Administrator for the Search Service Application". such as "Yogesh Sharma"
              And then click on "OK".

Step 2.3 And check the "Full Control" Permission.
             click on "OK". 

Now we need to define content source. 
Step 3.1 Go to Central Admin site, then Application Management, then Manage Service Application, and then Click on "Search Service Application". 
Step 3.2 In this page click on "Content Source" and then clcik on "New Content Source"

Step 3.3 Then fill the following information.
    Name                        : <Type the Content Source Name>
    Content Source Type :  SharePoint Sites
    Start Address            :  add the web applications names. such as http://SharePointSites
    Crawl Settings           :  Select 'Crawl under the host name for each start address.
    Crawl schedule          : Create a schedule " as it shown in below screen shot"
    Content source Priority : High
    Start Full crawl          : Uncheck
    Click on                    : OK

Now your Content source has been configured.

Step 4.1 Now you need to crawl the data, Click on "Start all crawls".

When the crawl is finished you would be able to see the search result. !!


Friday, August 16, 2013

When User profile synchronizations fails with event ID 6801.


When the image do not get updated in Active Directory by SharePoint.
When profile do not update for Microsoft Lync and outlook.

So many questions but we have only one solution..
Then we need to check event viewer of that server when you configured "User Profile Synchronization service" and here if you find event ID 6801, 
Then you are on right post. :)

Event ID 6801: It means the proxy of user profile service application has been deleted or get corrupt.

Resolution: In that case we need to re-create the User Profile Service Application Proxy" by Powershell command.

Step 1. First we need to delete old User Profile Service Application Proxy:

Type this script in Powersehll.
$proxy = Get-SPServiceApplicationProxy | where {$_.typename -eq "User Profile Service Application Proxy"}

Remove-SPServiceApplicationProxy -Identity $proxy -confirm:$false

Step 2. Second step you need to create the new User Profile Service Application Proxy.
 type this script in Powershell.

$app = Get-SPServiceApplication -Name <you need to give you user profiel service name here>

New-SPProfileServiceApplicationProxy -Name <proxyName> -ServiceApplication $app -PartitionMode


Step 3. Associate new User Profile Service Application Proxy with the existing web applications.
3.1 Open the Application management and then Configure service application associations


3.2 Then in the "Application Proxy Group" column, click on the nmae of the service application connection group that you want to change.


 3.3 Then check the "User profile Service Application Proxy" and then click on "OK"


Now our user profile service application has been created.
Wish you good luck !! :)

Please share you feedback with me on sharma-yogesh@live.com


Wednesday, July 31, 2013

How to install PDF iFilter on Sharepoint 2010 step by step?


Installation of PDF iFilter on SharePoint 2010

Step 1. Download Adobe PDF iFilter 9 for 64-bit platforms from here http://www.adobe.com/support/downloads/detail.jsp?ftpID=4025

Step 2. Install it on all SharePoint servers 2010.

Step 3. Download PDF icon file from pdf16.gif (http://www.mossgurus.com/adnan/Documents/pdf16.gif) and copy at C:\Program Files\Common Files\Microsoft Shared\Web Server Extensions\14\TEMPLATE\IMAGES\.

Step 4. Add the following entry in docIcon.xml file, which can be found at C:\Program Files\Common Files\Microsoft Shared\Web Server Extensions\14\TEMPLATE\XML.

<Mapping Key="pdf" Value="pdf16.gif" /> 

Step 5. Add PDF file type on the Manage File Type page under Search Service Application.

Step 6. Open registry by executing regedit on the Start --> Run.
             Navigate to the following location:
\\HKEY_LOCAL_MACHINE\SOFTWARE\Microsoft\Office Server\14.0\Search\Setup\ContentIndexCommon\Filters\Extension       

Step 7. Right-click Extension, a menu will appear.

Click New--> Key to create a new key for .pdf. See screen shot below:


Step 8. Step 8. Enter .pdf and save key.


Step 9.  Now add the following GUID in the default value as shown in the figure below.
{E8978DA6-047F-4E3D-9C78-CDBE46041603}

Step 10. If you are configuring SharePoint Server 2010, then restart Search service by executing the following command on the command line:
net stop osearch
net start osearch

Step 11. Now login on to Search Server 2010, then restart the SharePoint Server Search 14service as shown in the figure below:


Step 12. Reboot the all SharePoint servers.

Step 13. Run a full crawl.

Tuesday, July 23, 2013

How to enable Developer Dashoard In SharePoint 2010


The Developer Dashboard appears at the bottom of a page and allows site owners and up to view the call stack, database query times, exception information in error messages, and loading events for web parts during page rendering. All of these allow you to pinpoint the bottleneck within your page and to quickly focus on the resolution.

 The Developer Dashboard can be enabled via STSADM or PowerShell. This is one of the rare cases where the command in STSADM is shorter than PowerShell. The recommended property value is OnDemand, which provides you the ability to toggle the dashboard on and off
1.    STSADM
  • stsadm -o setproperty -pn developer-dashboard -pv on
  • stsadm -o setproperty -pn developer-dashboard -pv off
  • stsadm -o setproperty -pn developer-dashboard -pv OnDemand (recommended)
2.     PowerShell
$svc=[Microsoft.SharePoint.Administration.SPWebService]::ContentService
$ddsetting=$svc.DeveloperDashboardSettings
$ddsetting.DisplayLevel=[Microsoft.SharePoint.Administration.SPDeveloperDashboardLevel]::OnDemand
$ddsetting.Update()

An icon displays in the top right of the page when the Developer Dashboard is set to OnDemand — click this to toggle the dashboard on and off.

    
EXAMPLE OF DEVELOPER DASHBOARD

Friday, July 19, 2013

How to set auto refresh in SharePoint site step by step?


How to set auto refresh in SharePoint site step by step?

Step 1. Click on Site Action and then “Edit Page”


Step 2. Click on “Insert” and then “Web part”


Step 3. Click on “Media and Content”,then “Content Editor” and then  “Add”


Step 4.

Step 4. Click on “Edit Web part”


Step 5. Click on “Clikc here to add new content”


Step 6. In “Editing tool” section click on “Edit HTML Source”


Step 7. Then copy this Java script. (it will set auto refresh for two minutes or 120 secound).

<script type="text/javascript" language="javascript">
var reloadTimer = null;
var sURL = unescape(window.location.pathname);

function setReloadTime(secs)
{ if (arguments.length == 1)
   { if (reloadTimer) clearTimeout(reloadTimer);
       reloadTimer = setTimeout("setReloadTime()", Math.ceil(parseFloat(secs)*1000));
   }
   else
   { reloadTimer = null;
     location.reload(true);
     window.location.replace( sURL );
   }
}

setReloadTime(120);
</script>


Step 8. Then click "OK".

The SharePoint page has been set to refresh for 2 minutes.
Have a good day !! :) Enjoy

Tuesday, July 9, 2013

How to configure secure store service?


ahm !! Secure Store Service as the name defined it. This service store some security related content.
In technical words, The secure store service provides a database that is used to store credential. these credentials usually keeps user identity (user id) and password, but also can keep other fields that you define. For example : SharePoint 2010 can use secure store service database for access the external database. We can use this service in following applications.

1). Excel service
2). Visio Service
3). Performance Point Services
4). PowerPivot from SharePoint 2010
5). Microsoft Business Connectivity Service

1). We need to follow following steps to configure secure store service.
1.1). Create a separate user account in Active Directory for Secure Store Service.
1.2). Go to Central Admin site and Click on "Configure Service Account".

1.3). Click on "Register new managed account"

2). To configure Secure Store Service
2.1). Click on "Manage Services On server"
2.2). Choose the server name where you want to start secure store service and the start the service.
2.3). Then go to Central Admin Site and click on "Manage Service Applications" 
2.4). Click on "New" and select "Secure Store Service"
2.5). "Create New Secure Store Service Application" and fill the following information.

    Service Application Name      : Secure_Store-Service_Name
    Database Server                     : Give you Database Server Name
    Database Name                      : Secure_Store-Service_DBName
    Database authentication           : Windows Authentication
    Failover Server                       : Optional If you created any failover server please specify here
    Create New Application Pool : Secure_Store-Service_APName
    Select Security account           : Give your registered service account for this
    Enable Audit                           : 30 days (Your log will be store for 30 days max)
  

   Then Click on "OK"

3). Working with encryption key
3.1). Click on "Secure Store Services"
3.2). Click on "Generate New Key"
   
3.2). Provide the "Pass Phrase Key" e.g. ABC@123 and then confirm it.
        and then click on "OK"

4). Create a Target Application
4.1). Click on 'New"
4.2). Fill the following information and then click on"Next"
    Target Application ID     :  TestAppID
    Display Name                :  TestApplication
    Contact E-mail               :  abc@xyz.com
    Target Application Type :  Group
    Target Application Page URL :  leave it blank 
Then Click on "Next".
4.3). now here you can specify the credentials details fields for your secure store target application.
    let me describe you the YELLOW fields.
   Add Fields
From here you can add fields. such as Generic, User Name, Password, PIN, Key, Windows User Name, Windows Password.
   Field Name : Here you need to define specify field name. such as if you choose "Windows User Name" then type it. 
   Field Type  :  Here by drop down arrow you can set the "Field Type". Such as Generic, User Name, Password, PIN, Key, Windows User Name, Windows Password.
Then Click on "Next".
4.4). Add the "Target Application Administrator" and "Member"
    Target Application Administrator : <Type the UserName>
    Members                                    : <Type the Members Name>
5). Set credential for a target application
5.1). Check the Target Application and click on "Set Credentials"  

5.2). Now you can type the "External Data Source User Name and Password"
    This way your External Data Source and Windows Credentials goes mapped.  

Note : If the target application is of type Group, type the credentials for the external data source. Depending on the information that is required by the external data source, the fields for setting credentials will vary.
If the target application is of type Individual, type the user name of the individual who will be mapped to this set of credentials on the external data source, and type the credentials for the external data source. Depending on the information that is required by the external data source, the fields for setting credentials will vary.